Create Your Own Template
Here's a quick tutorial on how you can build your own template for scratch, and easily edit it to your needs.
Hello World!
Here's the starter template from the Bulma documentation, sans irrelevant metadata:
<!DOCTYPE html>
<html>
  <head>
    <meta charset="utf-8" />
    <link
      rel="stylesheet"
      href="https://cdn.jsdelivr.net/npm/[email protected]/css/bulma.min.css"
    />
    <script
      defer
      src="https://use.fontawesome.com/releases/v5.3.1/js/all.js"
    ></script>
  </head>
  <body>
    <section class="section">
      <div class="container">
        <h1 class="title">
          Hello World
        </h1>
        <p class="subtitle">My first website with <strong>Bulma</strong>!</p>
      </div>
    </section>
  </body>
</html>
Copy the code above and save it into a file (for this demo, we'll use demo.html). Once that's done, you can generate an image from this file:
from imgmaker import imgmaker

i = imgmaker()
i.generate('demo.html')

By default, imgmaker generates an image that is 512px wide, with dynamic height.
Adding customizable text
What if we want to add the ability to customize the text, and style it? Replace the text with Jinja template blocks.
<!DOCTYPE html>
<html>
  <head>
    <meta charset="utf-8" />
    <link
      rel="stylesheet"
      href="https://cdn.jsdelivr.net/npm/[email protected]/css/bulma.min.css"
    />
    <script
      defer
      src="https://use.fontawesome.com/releases/v5.3.1/js/all.js"
    ></script>
  </head>
  <body>
    <section class="section">
      <div class="container">
        <h1 class="title">
          {{ title | markdown }}
        </h1>
        <p class="subtitle">
          {{ subtitle | markdown }}
        </p>
      </div>
    </section>
  </body>
</html>
The markdown Jinja filter is a custom filter that lets you use Markdown formatting for input text (and also lets you use pretty-quotes because why not).
Save that HTML to demo.html, and rerun:
i.generate("demo.html",
           {"title": "imgmaker is _awesome_!",
           "subtitle": "\"The best Python app ever.\""
           }
)

HTML Layout, Images, and Styles
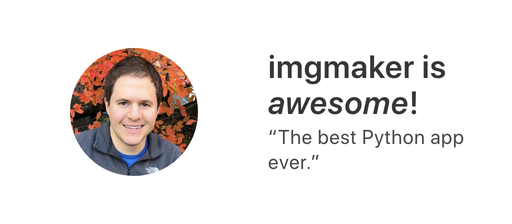
Two notable features of Bulma are automatic column sizing and fixed image sizes. We will refactor the HTML above slightly such that an image is in the first column, and the two texts are in the right column.
Additionally, we'll add basic Custom CSS support within <style> tags.
<!DOCTYPE html>
<html>
  <head>
    <meta charset="utf-8" />
    <link
      rel="stylesheet"
      href="https://cdn.jsdelivr.net/npm/[email protected]/css/bulma.min.css"
    />
    <script
      defer
      src="https://use.fontawesome.com/releases/v5.3.1/js/all.js"
    ></script>
  </head>

  <style>
    {{ custom_css }}
  </style>

  <body>
    <section class="section">
      <div class="container">
        <div class="columns is-mobile">
          <div class="left column is-half">
            <figure class="image container is-128x128">
              <img class="is-rounded" src="{{ image | img_encode }}" />
            </figure>
          </div>
          <div class="right column is-half">
            <h1 class="title">
              {{ title | markdown }}
            </h1>
            <p class="subtitle">
              {{ subtitle | markdown }}
            </p>
          </div>
        </div>
      </div>
    </section>
  </body>
</html>
The img_encode filter is a workaround for local file visibility: if you're downloading a remote image by providing a URL, it works as normal, but if you're using a local image, it may be necessary to use the filter to ensure the image gets passed to the template.
Save to demo.html and run this code.
i.generate("demo.html",
           {"title": "imgmaker is _awesome_!",
           "subtitle": "\"The best Python app ever.\"",
           "image": "https://avatars2.githubusercontent.com/u/2179708"
           }
)

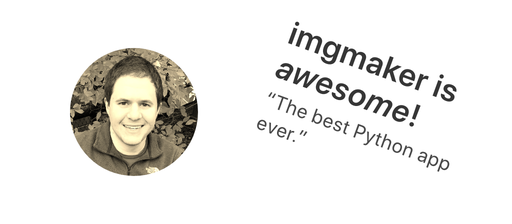
Now let's add some custom CSS. In this code, both columns are given different classes, which lets us style them independently.
i.generate("demo.html",
           {"title": "imgmaker is _awesome_!",
           "subtitle": "\"The best Python app ever.\"",
           "image": "https://avatars2.githubusercontent.com/u/2179708",
           "custom_css": ".left {filter: sepia(100%);} .right {transform: rotate(20deg);}"
           }
)

Have fun!